Arch Linux disk partitioning and encryption
Yesterday I set out to work through getting disk encryption configured on one of the 5 OptiPlex 7040 Mini PCS that arrived yesterday. I will be setting up my homelab with these machines and want to make sure I have mastered the process of disk partitioning and encryption.
The layout of the partitions and volumes will look like this:
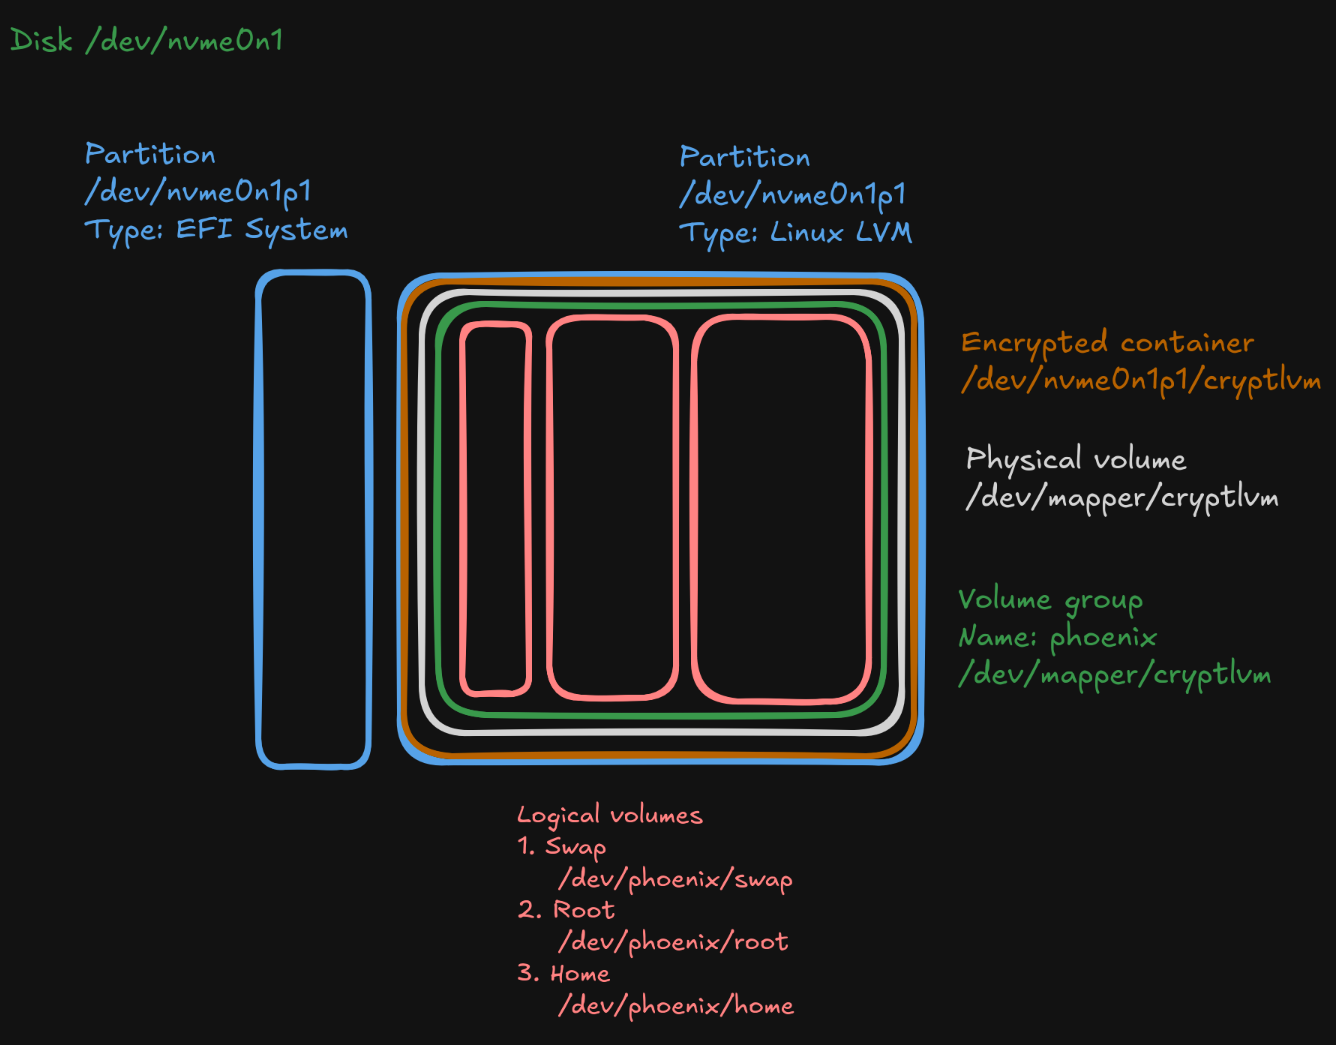
The size of the SSD is 128GB so I’ll be arranging the partitions/volumes like below:
cat /proc/meminfo # how much memory on the system
# Memtotal 8010000 kB = 8GB
# So swap will be 4GB (50%)
# sda is 128GB
#     par boot 1GB
#     par swap 4GB
#     par root 24GB
#     par home 90GB
GPT (GUID Partition Table)or MBR partition table
GPT (GUID Partition Table) is a newer partition table schema that allows for unlimited partitions and larger drives and is used with UEFI firmware, which is a newer version of BIOS. The older MBR (Master Boot Record) partition table is legacy format.
Check the system boot type
We need to verify that the system is using UEFI firmware, which replaces BIOS, and is typically used with GPT partitions.
# if the below dir exists its an uefi system
ls /sys/firmware/efi
To determine the current disk partition table we run:
fdisk -l

# youll see Disklabel type: gpt or dos(mbr)

# if there is no partition table or you can create a new one

fdisk /dev/vda
m # man page

g #to create a new GPT partition table
Partitioning the Disks
We will setup two disk partitions that will be the EFI and LVM partitions. Arch wiki suggests boot partition size of 1GB, and rest of the disk will be for LVM (Logical Volume Manager). LVM allows for more flexible management of disks space and our partitions will be setup within this layer.
lsblk # list block devices (shows current disk layout)

fdisk /dev/vda

n # add a new partition
#default partition number (default): 1
#first sector (default) : 2048
#last sector:
 +1G

#Change the type filesystem type:

t # change file system type
1 # select partition
L # show partition types

# Set partition type to EFI
  1

# create data partition
n # new partition

#default partition number (default): 2
#first sector (default) : 20992000
#last sector (default):  4000797392

t # change file system type
2 # select partition
L # show partition types

# Set partition type to Linux LVM
  44

p # print partition table
w # write changes to the disk
fdisk -l

Encryption & LVM
Using LVM makes managing encryption of the disk more straightforward as you only required one key / password to unlock the data.
# Create the encrypted container on the Linux LVM partition
cryptsetup luksFormat /dev/vda2

YES

#Enter the passphrase x 2 and open the disk to setup volumes

cryptsetup open /dev/vda2 cryptlvm

# Create a PV(physical volume) on-top of the opened luks container
pvcreate /dev/mapper/cryptlvm

# Next create a disk volume group (we are naming ours phoenix)
vgcreate phoenix /dev/mapper/cryptlvm

# Next create our logical volumes in the volume group
lvcreate -L 4G phoenix -n swap
lvcreate -L 24G phoenix -n root
lvcreate -L 90G phoenix -n home

# show our volumes

lvdisplay
File systems
Now that we have or disk arranged how we have planned, we need to setup a file system on each logical volume, we will be using ext4.
# setup the file system

mkfs.ext4 /dev/phoenix/root
mkfs.ext4 /dev/phoenix/home

# and the swap
mkswap /dev/phoenix1/swap

# Prepare the boot partition by making a FAT32 file system
mkfs.fat -F32 /dev/vda1

df -h # outputs file systems you have (-h is human readable format)
Mounting the volumes
For our system to access the new partitions / volumes we need to mount them first.
Order of mount matters we must map root, boot and then home.
# mnt will be the install systems root / directory

mount /dev/phoenix/root /mnt
mount --mkdir /dev/vda1 /mnt/boot
mount /dev/phoenix/home /home

# activate the swap partition
swapon /dev/phoenix/swap

df -h
And we are done, we can now processed with setting up our Arch Linux system. When you boot the system you will be prompted to enter your configured password, your data is safe!